E7 | Rain Garden, Wrought Iron Railing | Ask This Old House
Season 22 Episode 7 | 23m 42sVideo has Closed Captions
Jenn creates a rain garden; Ross explains moisture meters; Mark installs a railing.
Jenn Nawada teams up with a water conservation expert in Portland, Oregon to help two homeowners install a rain garden; Ross Trethewey shares how moisture meters can detect unseen water damage; Mark McCullough helps a homeowner increase the safety of their concrete steps by installing a wrought iron railing and showcases how railings are made at an iron fabrication facility.
Problems with Closed Captions? Closed Captioning Feedback
Problems with Closed Captions? Closed Captioning Feedback
Funding for THIS OLD HOUSE is provided by The Home Depot and Renewal By Andersen.
Support provided by:

E7 | Rain Garden, Wrought Iron Railing | Ask This Old House
Season 22 Episode 7 | 23m 42sVideo has Closed Captions
Jenn Nawada teams up with a water conservation expert in Portland, Oregon to help two homeowners install a rain garden; Ross Trethewey shares how moisture meters can detect unseen water damage; Mark McCullough helps a homeowner increase the safety of their concrete steps by installing a wrought iron railing and showcases how railings are made at an iron fabrication facility.
Problems with Closed Captions? Closed Captioning Feedback
How to Watch Ask This Old House
Ask This Old House is available to stream on pbs.org and the free PBS App, available on iPhone, Apple TV, Android TV, Android smartphones, Amazon Fire TV, Amazon Fire Tablet, Roku, Samsung Smart TV, and Vizio.
Keep Exploring


This Old House Insider Newsletter
Get This Old House exclusive stories, tips, and behind-the-scenes information delivered right to your inbox every month.Providing Support for PBS.org
Learn Moreabout PBS online sponsorship♪♪ Kevin: On "Ask This Old House," our experts travel across the country to answer questions about your house.
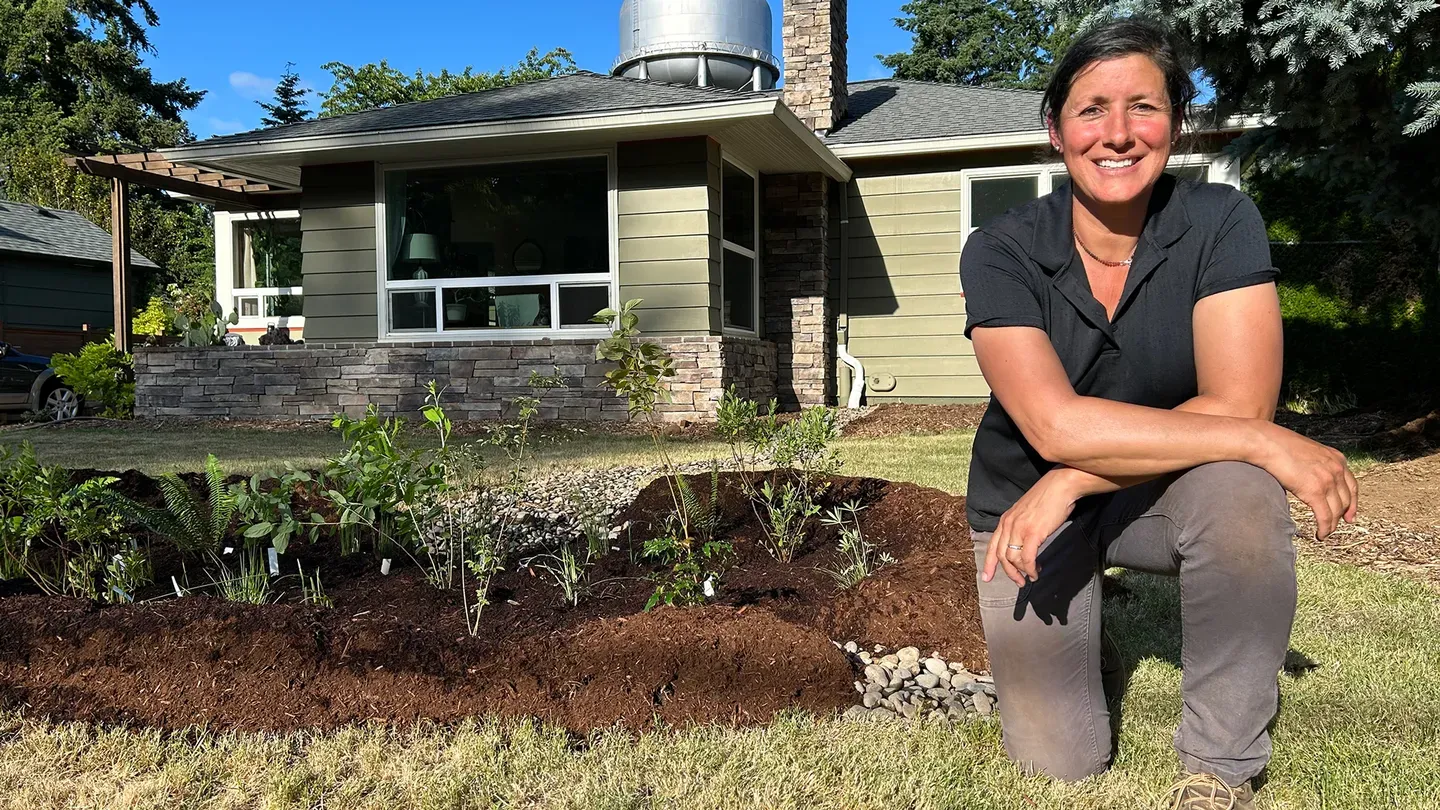
♪♪ Today, Jenn heads to Portland to install a rain garden.
Jenn: Alright, so now it's time to plant.
Kevin: And Ross shares how moisture meters can help you identify potential water damage.
Then Mark improves the safety of a homeowner's concrete steps by installing an iron railing.
Mark: Alright.
Scott: Looks good.
Mark: Yeah, looks great.
Kevin: That's all coming up next on "Ask This Old House."
♪♪ ♪♪ Jenn: Hey, Aaron.
Hey, Autumn.
Aaron: Hi, Jenn.
Autumn: Hey, Jenn.
Welcome to Portland.
Jenn: Nice to meet you in person.
So excited to get your e-mail about rain gardens.
I think it's an important topic.
So why don't you tell me a little bit about your lot?
Aaron: We moved in a year ago yesterday, and we have a little under a quarter acre here to deal with.
Jenn: Wow.
That's a lot.
That's a lot of land for this area.
Aaron: It's a lot of land for this area and it's all grass.
And we are looking for ways to reduce our footprint.
Jenn: Okay.
Yeah, because sometimes grass is like just green asphalt and a lot of water runs off.
Aaron: Absolutely.
Autumn: And, Jenn, Portland's climate is really changing.
We both moved here about 20 years ago and it was just constant rain all the time.
And now with our changing climate, we're just getting a lot more dry days, long stretches of really hot weather and started thinking about how do we use this space in a way that is going to make plants grow, use water well so that we're not watering all the time.
And so we got interested in rain gardens and we are looking for help and how to install a rain garden.
Jenn: Well, I have a friend who lives in the area and she works for the Soil and Water Conservation District and she is on board, happy to help.
We've already talked about possibilities here, so I want you to come meet her.
Autumn: Let's meet her.
Jenn: Alright.
Aaron: Alright.
Jenn: Hey, Kathy.
Kathy: Hey.
Jenn: So good to see you.
Thanks for coming.
I wanted you to meet Aaron and Autumn.
And they want to talk about water conservation.
Autumn: Hi, Kathy.
Nice to meet you.
Aaron: Nice to meet you.
Kathy: Nice to meet you two.
Thanks for having me over.
So, as the Soil and Water Conservation District, we're here to help folks manage their soil and stormwater resources.
And on a house this size, in a one-inch rainstorm, you typically see about 900 gallons of water flow off.
And so it's always good to find a way to manage that and to -- a place to put the water essentially, so that it doesn't flow off and into the street and picking up all kinds of oils and dusts and things like that and making their way to the -- to the stream or water-treatment facility.
We're talking 33,000 gallons of water per year that we can use on this landscape.
Autumn: So, Kathy, do we determine the size of the garden based on the size of the roof?
Kathy: That's right.
We'll take a walk around and identify where your downspouts are coming down.
Autumn: Okay.
Kathy: And that's where we'll figure that out.
Jenn: I have an idea.
Why don't we look at the front foundation, determine where those downspouts are, and then we'll figure out a game plan?
Alright.
So it looks like there's just one.
[ Laughter ] Kathy: That makes it easy, doesn't it?
This is a great location for a downspout, actually.
And what would be really great is if we could just move the water from that downspout and we could put in a river rock creek that would direct it right to a rain garden.
Autumn: And from here, where should we put the rain garden once we divert it from here?
Kathy: Well, some of the good rules are it needs to be at least 10 feet away from the house.
If you have a basement, two.
If you don't have a basement, it needs to be at least three feet away from like driveways and streets and things like that and at least two or three feet away from any sort of pathways because it's going to be a bit of a dip.
And so you want to have it in a place where people aren't just going to accidentally step off into it.
Jenn: That makes sense.
Autumn: And considering all those specifications, how big are we wanting to make this garden?
Kathy: Well, you know, Jenn and I were looking at the topos online, and you can use a tool to measure the area of your roof.
This area here was around 350 square feet.
Jenn: Yeah, yeah.
Kathy: So one of the rules for the rain garden is you want at least 10% of area that will be able to capture that water.
So for 350 square feet, you'll want at least 35 square feet.
The other thing that we need to think about is how well the soil is going to absorb that water.
And so the first thing we'll want to do is to do a percolation test, which is basically just digging a hole and adding some water and seeing how quickly that water drains.
Autumn: What's the ideal drainage rate?
Kathy: The ideal drainage rate of a percolation test, you want to get at least a half an inch an hour.
Jenn: Because if it doesn't drain properly, you're going to want to rethink where you're going to put the rain garden.
Otherwise you're just going to have overflow and then it's just going to flow out into the street.
Alright.
Our soil test looks good.
The percolation rate is three inches per hour.
Kathy: The thing we're going to do next is place the downspout redirect to put the water to our rain garden.
Jenn: Alright, Let's start by marking out the shape of the rain garden.
♪♪ Kathy: The anatomy of a rain garden is such that you want it to slope steadily and then the center area is going to be... your deepest.
♪♪ One, two, three.
[ Grunts ] ♪♪ ♪♪ Jenn: Along with digging the basin, we're going to be digging out the river rock bed.
♪♪ Next, we'll incorporate a four-way soil mix into the existing soil.
We're also making sure we don't compact the soil.
Keeping the soil loose will encourage water filtration and allow the plants easy root growth.
Now we're going to lay landscape fabric down the trench as a barrier between the soil and the river rock.
Kathy: We're going to cut it roughly to size before we lay the rock down over it.
The reason we've chosen river rock is, one, because we're mimicking a small creek, but, two, river rock doesn't compact.
All the rounded edges allow water to easily flow in between the rocks, and it won't ever, over time, compact.
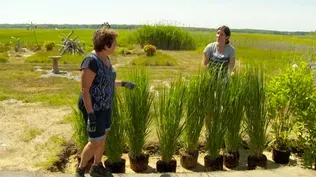
Alright, so now it's time to plant.
We've chosen a mixture of deciduous and evergreen native trees and shrubs and ground covers to fill this space to help with a little bit of privacy, to also add some visual interest and to add some wildlife habitat.
A lot of these things are flowering and fruiting.
They also will soak up all the water in the wintertime, but can also withstand drought during the summertime.
We're going to use the old sod that we pulled up and place it around the edge just to give it a little lift that will hold the water.
Alright.
And finally, we're going to just put the mulch down.
We want to put it down just lightly to hold the moisture in and add a little organic matter.
You'll want to keep watering through the summer months while they get established.
After that, they'll take care of themselves.
Jenn: So what do you guys think?
Autumn: We love it.
Aaron: We're really excited.
Autumn: It is better than we could have imagined and we're super stoked about it.
Jenn: Well, this is a fantastic project because you're addressing water conservation and keeping your water on site for the ground recharge.
So love that.
And, you, great job on this whole design work and plan.
It's function and form and it's beautiful as well, so... Kathy: Absolutely my pleasure.
Jenn: Yeah.
Nice job.
Autumn: Kathy, thank you so much for all of your expertise and your wisdom in helping to guide this project.
It's awesome.
And thank you, Jenn, for coming all the way out here to help us.
Jenn: My pleasure.
Aaron: Thank you so much.
♪♪ Kevin: Hey, Ross.
Ross: What's up, Kev?
Kevin: You tell me.
What's with all the gadgets?
Ross: We got -- We're talking about water damage, right?
Is one of the most common insurance claims filed for by homeowners across America.
Kevin: Water in the house, not a good situation.
Ross: Right.
It could be groundwater, bulk water from rainwater coming in.
It could be a plumbing leak.
It could be a toilet drain.
It could be...condensate.
Right?
There's a lot of things may be coming from inside or outside.
We don't always know.
And a lot of times it's in hidden spaces like behind drywall.
Kevin: Right.
So how do we find it if it's behind drywall?
Ross: So the first thing we typically do is when we're doing a home energy assessment, we're thinking about thermal imaging cameras like this.
This is going to see surface temperature.
And what we're typically using that for is for insulation to see do we have insulation in walls and in roofs and stuff like that.
In this case, though, a byproduct is we can also see water because water is typically going to be at a different temperature than the air.
Kevin: Look at that.
Ross: Right?
Kevin: So I've got a little amoeba looking thing.
Ross: Right, somewhere here?
Kevin: Yeah, right there.
Bluish, whereas around it's kind of a gray or red.
Ross: That's right.
Kevin: That's an indication of water because there's the different temperature?
Ross: That's right.
So if I was scanning that, I'd be like, "Alright, I don't know if it's necessarily water.
I know that there's something going on in this area."
It might be a lack of insulation on a cold day with cold air infiltrating through or it could be water.
Kevin: Okay.
So this might be the first indication.
Ross: That's right.
Kevin: How do you confirm?
Ross: Yep.
First pass.
Alright.
Second pass is we can use one of these, which has an electromagnetic sensor.
Kevin: So this is a water meter?
Moisture meter?
Ross: Moisture meter.
Exactly right.
It will sense up to three quarters of an inch into the wall.
Kevin: Okay.
Ross: It will work with all building materials, right?
So it can work with concrete, masonry, drywall, and it's going to give us more targeted.
It's going to tell us where that moisture is.
And it does it nondestructively, meaning so I can scan and I can see 6%, 8% and then all of a sudden look at that, right?
Kevin: Oh, yeah.
Ross: So I've got problems... Kevin: Right there.
Ross: ...right here.
Kevin: That lines up with the little amoeba I saw.
Ross: That's right.
So it's telling me percentage of moisture.
And, you know, really what we're trying to do is make sure that stuff stays in that 6% to 9% range.
Kevin: That's a good range?
Ross: That's a good range, but I'm seeing, you know, 15, 18, 20.
Right?
So this is going to tell us really more pointed and indicate it is water.
Kevin: Okay.
So that's a good device to have.
The others?
Ross: We can go a step further and go pinned.
So, this is destructive, meaning that I actually have to pin the wall to actually get the moisture reading and it's going to send electricity current across the pins.
And obviously more water on the wall means less resistance.
So it means that I have more water content in that wall, so much more accurate, but it's not going to work for concrete, masonry, and other types of materials.
It will work for drywall and wood, of course.
Kevin: Right.
I've seen the wood flooring guys use this and they stick it into the back of their samples or whatever.
So no problem putting little pinholes in this wall.
Will you give us a reading and...?
Ross: Sure.
Kevin: Put it -- Yeah.
Go down.
That's good.
Right there.
Ross: Right there?
Kevin: Yeah.
Thereabouts.
Ross: Yeah.
-[ Meter beeps ] Kevin: Yeah.
Ross: There you are.
Kevin: What do you got?
Ross: 16.
18.
Yeah.
Kevin: Now, can you come up about two or three inches?
A little higher.
A little higher.
A little left.
Right there.
Ross: Right there?
30.
30.
We're off the charts.
Kevin: Corresponds to the amoeba again like that.
Ross: That's right.
Kevin: Very cool.
So this is -- Are you saying this is more accurate than this?
Ross: It is.
It's going to be very localized to where those pins are.
Kevin: Gotcha.
Okay.
Ross: There is a combo meter.
So this has got both.
Kevin: Oh!
Ross: So it's got an electromagnetic sensor here and it's got the pins.
Kevin: Sneaky.
Ross: Right?
So two for one.
I got a two for one with that.
But it's only going to give us the relative scale.
It's not going to give us percent moisture content.
It just tells us dry or wet on a sliding scale.
Kevin: Oh, gotcha.
Can you get a combo that gives you a perc-- Ross: More expensive.
Kevin: More -- You can.
Gotcha.
I can't say it, but there it is.
Ross: Yeah.
There you go.
Kevin: So if 6 to 9 is a good reading -- Ross: That's ideal.
Kevin: Ideal?
Ross: Yeah.
Kevin: What happens as we go up the scale and when are we in trouble?
Ross: Right.
So once you get to 15, we're starting to get worried.
Once you go beyond 15, we start to get really worried.
Kevin: And what are we worried about?
Ross: We're worried about mold.
We're worried about wood rot.
We're worried about structural damage.
We're worried about a lot of things.
Kevin: Gotcha.
Ross: Right?
So in a perfect world, everything would be between 6% and 9% for all building materials and for a normal indoor space.
Kevin: If I get 20%, 30%, what am I doing?
Am I tearing things out?
Am I blowing it dry?
Ross: Yeah.
When you get that much moisture, you know, more than 20, you definitely need to replace the Sheetrock in this example.
Kevin: Yeah.
Ross: So you'd be cutting out that section, removing it, making sure -- inspection -- to make sure there's no other mold or anything behind there.
Usually we take a larger section than where we see the water because the water will migrate.
Right?
So that's -- If you have a little bit of moisture, then you can run maybe some dehumidifiers and just dry out the space to help.
Kevin: Cool.
Alright.
So I know this is expensive.
Most homeowners aren't going to be playing with this one.
You guys are.
But these right here, they look like I can find them down at the store.
Ross: That's right.
Kevin: Sense a price for them?
Ross: Yeah.
All less than $100 for all of them.
Kevin: Oh, nice.
Very cool.
Ross: Yeah.
Yeah.
Kevin: Which is good peace of mind if you're trying to find something you can't see.
Ross: That's exactly right.
Kevin: Awesome.
Ross: You got it.
Kevin: Thank you, Ross.
Ross: Cool.
Kevin: Alright, cool.
Ross: Which one do you think?
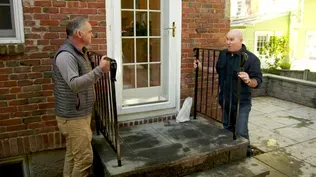
♪♪ Mark: Scott.
Scott: Mark, nice to see you.
Mark: You as well.
How you doing?
Scott: So, Mark, I wrote in to the show about these stairs over here, these concrete stairs.
Mark: Okay.
Scott: I have two young children and I have grandparents that are coming over all the time to watch them.
They run onto the back yard.
We just have a safety concern.
Mark: Alright.
Scott: It seems a little steep.
We're wondering if we could get some sort of railing in here.
Mark: Alright.
So I just took a measurement.
We're actually well within the code.
So you really don't need a railing.
But I do love the idea.
Parents getting older, kids running around.
Safety is always paramount.
So even looking at these steps, they're super solid.
So they'll really accept the installation of the railings perfectly.
So did you have a design in mind?
Scott: We actually have some stuff over here.
Mark: Alright.
Let's check it out.
Scott: Take a look.
Yeah.
So we really like these guardrails.
We'd really like something to match up with that.
Mark: That's a great idea.
This is wrought iron, which is typically used in this situation.
I love the simple design.
This picket is twisted, this one straight, twisted, straight and so forth.
So I think what I'll do next is just get some measurements, take some photos.
I have a guy who's perfect for this job.
He can weld everything up for us and you and I can install.
Scott: That sounds great.
Mark: Alright.
♪♪ Iron fabricators can be found anywhere across the country.
They mostly work with either steel or iron.
They're a great option for homeowners looking for gates, stairs or railings that are built to last.
Scott has chosen wrought iron for the material on his railings.
Wrought iron is very common to use for railings because of its sturdiness and durability, and it still looks delicate.
Wrought iron arrives in rods spanning 20 feet long.
Ironworkers lay out the materials and, using a bandsaw, will cut the pickets according to code.
Railings are cut to 36 inches in height.
Next, they'll add the twist details to every other picket.
To do this, a bender machine is used.
It's designed to twist or curve the metal to the desired shape.
With all pieces prepped, it's time for assembly, which they'll do by laying out the pickets, post, and handrail and welding them together.
♪♪ After welding, the assembled railing is then smoothed out with the grinder and prepped for the final step.
And finally, the railing is primed and painted to create a finished look.
♪♪ Alright, Scott, what do you think?
Scott: Looks fantastic.
Looks like it matches perfectly.
Mark: Oh, yeah.
Scott: It looks sturdy.
Love the detailing.
Mark: Right.
So you can see this piece right here with a little detail at the end.
It started out as a straight piece.
The twisted picket, the straight picket, twisted picket, all the details there.
This is much better than just pulling something off the shelf.
And I'll tell you why.
You can feel and even see how heavy this is.
Scott: Yeah.
Mark: If we pulled something off the shelf, they come out hollow.
Not only is this heavy-duty material, but we're going to sink it into the concrete and lock it down.
So it's going to really, really be sturdy.
Scott: Great.
Mark: Now, placement, as you know, is very important.
We have a couple obstacles that we want to avoid.
The most important is going to be the door.
So we want to be able to get the door open, the door closed, and then still have a little bit of room to operate if you will.
So I have figured that I want to come 3 1/2 inches from the outside in.
Again, that's going to get me into the beef of the step, which is where I want to be.
Scott: Okay.
Mark: And then because I want to be able to use the handrail, let it breathe a little bit, I'm going to bring it out of the house 7 inches.
So if you grab that end of the rail and bring that up.
Just hold it steady.
I'm just going to double-check.
Seven there.
A little bit...to you.
My three and a half.
The rag out of the way.
So that gives me enough space in here to be able to use that bend.
See the detail that we put in.
How does that look to you, Scott?
Scott: Looks great.
Mark: Alright.
Give enough -- enough room.
Operate the door open and closed.
So why don't we take that rail back out?
Alright, Scott.
So let's get started.
Scott: That's not your average drill right there, Mark.
Mark: So this is not.
This is what we call a coring machine.
You can see this bit is nice and round, so that's going to give us a perfect circle.
And this right here is just a piece of plastic that we're going to use as a template.
We already have our drill bit mimicked into that plastic.
That's hovering over where our post is going to go.
So all we have to do is take this drill, put it into that hole, let the machine do its work.
Now, right now I'm going to do a dry run and just score that so it'll control the coring machine just a little bit.
♪♪ ♪♪ Alright.
Nice job.
Okay, now we're going to put the water on.
This is what we call a boot and we're going to cover our hole with the boot.
And what that's going to do is actually keep the water at bay so we don't get soaked.
It should be right there.
Okay.
Alright, Scott.
Now it's time for the install.
Set it in.
Lift that up a little.
[ Grunts ] Alright.
Scott: Looks good.
Mark: Yeah, looks great.
So we're going to use these block of wood, and that's just going to help us...stabilize.
Scott: Yeah.
Mark: Yeah.
So a couple little tricks.
Good.
Okay.
You can see that I want to leave an even space around this post so that way the material that we mix will float around.
So we're going to use a different type of cement than we normally do.
This is called hydraulic cement.
And what it means is it gets very, very stiff very quickly.
So we're going to have to work fast.
Alright.
Give me about five seconds worth of water.
Good.
I'll start with that.
Scott: Perfect.
Mark: Yep.
Scott: What's the consistency supposed to be on this?
Mark: So, when we're making regular mortar type N, we like to use what we call an oatmeal consistency.
And this right now we call soup.
Scott: [ Chuckles ] Mark: So very, very wet, very liquid and very easy to move.
I want to make sure I don't have any clumps.
So, Scott, I'm going to give this over to you.
Scott: Alright.
Mark: And pour it.
And we're going to sponge that post off when you're done.
Scott: Okay.
Mark: I'll help you get the material down to the bottom.
Don't be afraid to go over here to the side.
Scott: Yep.
Mark: Just like that.
Scott: So we can go around.
Mark: You can go around.
Again, I'm going to help you get it in, but you can see it... Scott: Yeah.
Mark: ...starting to set up just a little bit.
Scott: Already.
Mark: Yeah.
Already.
And the other thing we're going to want to make sure is we give it a little bit of a bevel.
That way the water will run off.
Okay.
Alright, Scott, we're looking good here.
Why don't we take a step back, check it out?
What do you think?
Scott: Looks fantastic.
Looks like it's been here for 50 years.
I'm really excited about it.
Mark: Yeah, that's the bonus to these little projects is when they fit, they fit.
Scott: Yeah.
That's great.
Mark: Alright, so I'm just going to leave you a little bit of homework and all that is, is to make sure that people stay off of that railing for 24 hours or so.
Other than that, you are good to go.
Scott: Well, thank you again.
It looks fantastic.
I'm so happy.
Mark: Alright, Scott.
So if you've got questions about your house, we'd love to hear from you.
So keep them coming.
But until next time, I'm Mark McCullough for "Ask This Old House."
Scott: Fits right in, right?
♪♪ Kevin: Next time on "Ask This Old House"... Lee shares his snow-removal tips to prepare for the coming winter.
Lee: I got magnesium chloride, which is much better for the environment and much better for the pets.
Kevin: Then Mark shares his list of go-to masonry tools.
Mark: You can see I got a nice edge on it.
Kevin: And on "Build It," Tom is ready to upgrade the workspace by building a miter saw station.
Tom: We even got the wheels.
We can roll it back.
Kevin: All that on "Ask This Old House."


Funding for THIS OLD HOUSE is provided by The Home Depot and Renewal By Andersen.